Emotions and Colors – part 1 of many many many postings to come.
I posted a poll recently and I wanted to talk a little bit about it.
I’ve been doing research for a while into the emotions that colors evoke within us. I love this subject. I understand that I may be standing relatively alone in my love of all aspects of color theory but I’m ok with that. This is interesting stuff.
In my quest, I’ve posted a poll here.
This poll has nothing to do with any sort of data mining for myself it’s all about getting you and me to think about the deeper aspects of color. I took this poll myself after making and realized how many conflicting feelings I had about certain color combos. It surprised me. So if you have any interest in the colors, take the poll and learn something about yourself. Over time I’ll keep sharing results but… They are all over the place.
Here’s the 2nd color combo in the poll
Here’s the poll results with 33 people having taken it.
This one isn’t as varied as some of the others but it does show that some love it and some don’t. And that’s ok. Have you walked into a yarn shop saying “I will not buy anything” and then there’s this sample that just screams JOY to you and your resolve is gone. This is what it’s about.
Take the poll if you haven’t already and learn a little something about your color preferences. I’ll keep coming back to talk about this and my results. I’m leaving the poll open for the foreseeable future so you can take it again or have your friends take it. It’s worth the look if you’re at all curious about how you react to color.
and now, here’s the video where I talk about this.
These are the tonals that Spunky Eclectic are making. That’s the whole series of them. They’re somewhat similar to the almost solids except that i combined 3-4 colors into one to make one cohesive colorway that isn’t going to be drastically differently like most handpaints. This is going to work to give me a lot more heathers if that’s what I want. Or it can be completely variegated. How?
I made 2 samples for this. One is a stand alone singles yarn that I didn’t split or predraft in any way. I just spun it end to end. The other is one I split up/predrafted a bunch so the colors would get homogenized a bit. The 2 yarns together don’t look all that different but when I knit them they will most definitely show up differently.
I achieve that test sample without knitting but wrapping some yarn around a piece of cardboard. No, it’s not as good as a swatch but this girl is busy and so are you. This is an acceptable way to test how the color is going to look, pre-swatching. Yes, you still need to swatch for gauge but that’s a different thing. This is color swatching.
If you wanted a look at each one separately This is the plied yarn:And this is the stand alone singles:
You can see the difference right? This is part of why it’s hard when someone asks me “what is that going to look like spun up”. I don’t know. What is your predrafting method? What is your spinning method? Are you plying it? How many plies?
If you want to hear me talking more about this – here’s the video.
PS… for the non-spinners, I also make this colorway set in yarn but you can see that it’s really vastly different looking then it comes out in handspun.
The idea happened that I (and others that wanted to join me) would cast on 20 projects for 2020. There is no rule that anything has to be finished. You just need to cast on 20 new projects. You might remember I had a week long castonpalooza last year but this was going to top that.
20 projects
Whatever I want
No rules about finishing.
But I did cast on projects I love and want and will think I will wear.
And I actually want to pledge to finish 10 of them this year.
You know I’ll knit more then ten things, right? I’ll probably cast on other new items. At some point I might feel the need for a new castonpalooza but for now I’m feeling good with the ones I have. And I actually cast on for 21 but did manage to finish one.
Let’s get to it shall we?
First project finished 1/21
Pattern:Biggie Hat Rumpus. Yarn: Targhee Biggie. Colorways: Teeny Bikini and Birthday Cake Limey Green: Pattern: Illyria. Yarn: Targhee Biggie. Colorway: Ginkgo
Blue: Woven Cable Headband. Yarn: Fat Panda. Colorway Bonnie BlueI started and am nearing the finishing on a pair of bulky mittens for Kate. I’m just winging the pattern because I like doing that. And the yarn is discontinued SECrochet Dark cowl: Pattern: Copenhagen. Yarn: Panda sock. Colorway: Twilight Pine.
Knit Lighter Cowl: Pattern: Dance in a Hurricane. Yarn: Targhee Biggie . Colorway: New Tonals colorway Hydrangea .My needles broke on this one and I need a new set.
Pattern: Harvest Weather. Yarn: Fat Panda. Colorway: Dusk, Teeny Bikini, and Forest.
Natural Color: Pattern: Hitchhiker. Yarn: CVM. Colorway: Aster.
Fire Colors: Pattern: Terribly Simple. Yarn: Handspun that had no tag. It’s a single and feels like merino but I don’t have any clue on the colorway And now…… Let’s talk about the ridiculous amount of sweaters I cast on for. Which ones will get finished this year? Hmmmm……
Reddish/Rust: Pattern: Bailey Cardigan. Yarn: My handspun 2ply from some Spinner’s Hill batts
Mustard: Pattern: Carbeth. Yarn: Targhee Biggie. Colorway: Dijon
Bright Pink: Pattern: Waits. Yarn: Discontinued Victoria. Colorway: Teeny Bikini .
Mottled mauvey: Pattern: Mr Greenjeans. Yarn: Targhee Classic . Colorway: Zombies Luncheon.
Rose: Pattern: Ryder Pullover. Yarn: O-wool balance. Colorway: Discontinued.
Pattern:(top left) Ausable. Yarn: Berroco Vintage Chunky. Colorway: Douglas Fir.
Pattern: (top right) Felix Pullover. Yarn: Fat Panda . Colorway: No Pimiento.
Pattern: (bottom left) Grace. Yarn: Quince and Co Puffin. Colorway: Marsh .
Pattern: (bottom right) Weekender . Yarn: Candy Cane.(OOS online) Colorway: Forest.
Pattern: (two color one my hand is on) Fern and Feather . Yarn: Targhee Classic. Colorway: Blue Collar and Ghosted.
Pattern:(Dark one at the top of photo) New Berlin Gansey . Yarn: Remix from Berroco . Colorway: Nightfall .
Pattern: (Light blue bottom right) Colchis (not released yet) . Yarn: Moka Farms- Kid 3ply . Colorway: Dusk .And if you want to see me talking about all of these in the video….
Here we go with my pledge for 2020. Are you ready? It’s long.
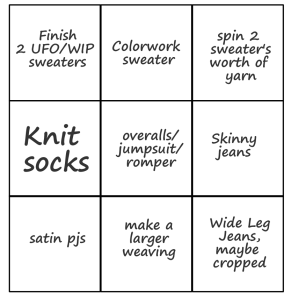
This is my 9 patch… I know it’s not a quilt but work with me here. It’s all fiber related. I’m going to go through this row by row here.
1. I want to finish up some UFO/WIP sweaters.
I’m pledging 2 but I might do more. You know I’ll cast on for more. I’m not great at keeping track of actual tallies but I think I finished 5 in 2019 but started 82. (give or take some)Self designed sweater using Jill Draper and my CVM on the left and on the right is my handspun Ramona cardigan.
This is a Basic Chic Pulli in SE Targhee Classic and SE Candy Cane. I know I’m only showing 5 of the claimed 82 sweaters but I just didn’t want to dig them all out. I’m sure you’ll understand. If you follow on Instagram you’ll see it all at some point and I try to make a post here as well.
2. I want to make a colorwork sweater.
I don’t have that started just yet but I might be working on something tonight. First up I’m thinking of Fern and Feather in SE Targhee Classic and I’m thinking of Pheasant in Some handspun CVM.
3. I want to spin a couple of sweater’s worths of yarn. Part of that is because I have 2 lots of fiber sitting here waiting for me and my sheep grow more and I want to spin more. And thats not even counting the deep stash dive of sweater lots there. So much more spinning needs to be done. Both lots shown are BFL The hot pink is Beach Blanket Bingo and the other is Smells Like Leather.
4.I’d like to actually get some socks done.
It was my one big failure in last years list and I’d like to complete at least one pair this year but possibly more. This is really just a small fraction of the unfinished sock pile.
5. Overalls! I need more overalls and jumpsuits in my life.
I made a couple of muslin pairs last year and it’s time I got more done. Like in this taco fabric! But also a posh pair in linen for fancy occasions would be good.
6. Skinny Jeans.
I’m embracing my love of skinny jeans and I actually like the fit of the ones I get that are ready to wear. Still…. There’s no reason tho that I can’t make myself a couple pair. I mean, look at the leopard print bengaline. It’s just itching to be jeans!
7. Satin PJ’s
I made 2 sets of satin PJ’s this year from left over satin material I had. They are so comfy in the summer. I feel all fancy and like I’m lounging in style (even if I rarely lounge these days, I feel like I’m working or studying in comfort). One pair I used my standard flannel pattern and made it in satin. These, the bottoms are the same as the flannels but the top is an Ogden Cami. If you can keep a secret…. I might just wear that cami under a sweater too. Double duty.
8. Weave.
I started off last year with big plans and ideas and I knit more then I wove. Which is fine but I still have big plans and ideas. I need to get some big weave project done. I just feel it as a need deep down in my bones.
9. Wide leg jeans.
I’m going to fix this Jenny trouser to suit me. This was my muslin in a stiff cheap canvas twill. I like the material but it was a great muslin because cheaper cottons stretch too much and this is going to give me the answers I need to fix it to fit me better. Because of where my waist and short little body is, I need to do a bit of work. I’m up for the little challenge here and I will hopefully have these or the final ones done by the end of the year.
Today I posted a video where I wanted to talk about the end of year planning stuff. I talk about this every year and it’s all about organizing for productivity. If you’re not feeling as productive as you’d like to be (and you’re not just being too hard on yourself) then take a peek at the video and see what I’m going on about….
Then come back here to click some links. Last year I talked about how I planned out my year so I had time to do all I do on a daily basis and get ready for shows. These are my calendars which as of today, are still fairly blank. I will be working on that the rest of the week with the hopes that it’s all ready by the time the 1st rolls around. My next year is going to be stupid busy. I know it is and I know I did this to myself but it’s for a big goal I hope to hit in December 2020 (more on that another time). The above pages are more of the pages I’m putting in to keep my goals on track, my accomplishments noted and so I don’t miss moons and birthdays. Last but certainly not least is my planner with all my weekly pages in it. I have appointments and events that are appointed to a certain day and then the other side are weekly things that need to happen. I’ve been using this for a month or 2 and it’s working out for me so far. Armed with my handy planner squad and my big giant leather one (not shown here) I will conquer this year. Yes I will.